

Deep Delve into React Native
Over my last few months, I was taking the time to explore the mobile application framework React Native. It was an arbitrary decision to go for this framework to get started on the mobile space.
It is definitely not the easiest language to access with the large # of errors encountered during the setup & development phase. Interesting how this language is considered a popular language. While the learning is done as a personal venture, this list of details is not representative of whatever any beginner should learn before they get started. Rather, I wish to advocate that you delve deep into the topics of interest so you can continue to hone/kindle the curiousity within.
What is the difference between React & React Native?
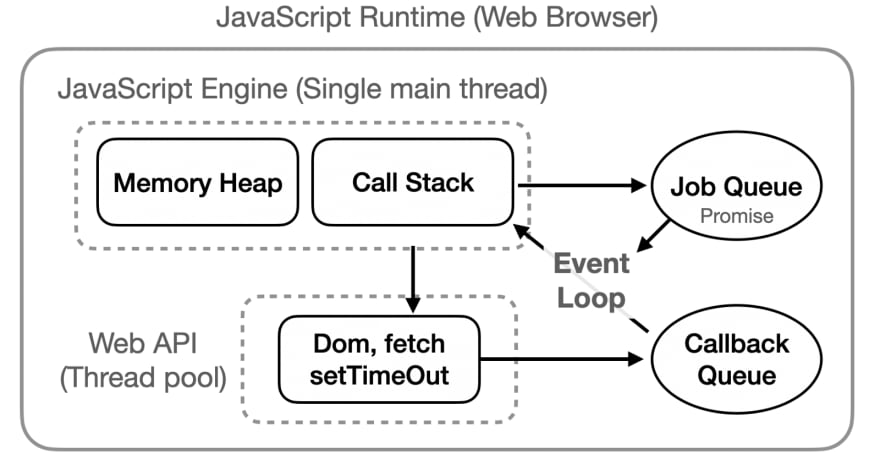
React runs on the Javascript runtime environment that is on the browser. It has a single Javascript thread & runs web APIs natively available in the browser.
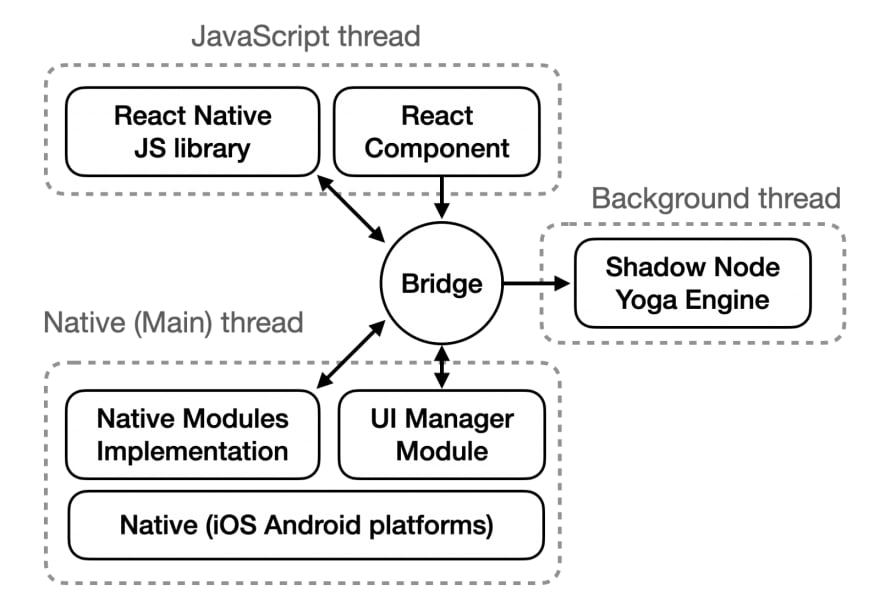
React Native Execution Environment has 3 key components: JavaScript Thread, Native Main Thread, & the Background Thread to handle Shadow Node. In RN, we have the Bridge to facilitate communicate between these 3 components.
What is the RN Bridge?
Reference: http://blog.nparashuram.com/2019/01/react-natives-new-architecture-glossary.html
The current communication between JavaScript thread & Java/ObjC happens over ‘the bridge’.
This bridge is a queue to send messages encoded as JSON String between the JavaScript thread & Java/ObjC. During every tick, RN engine dequeue message from the bridge and process them; allowing for asynchronous processes.
The bridge also exposes an interface for java/ObjC to schedule JavaScript executions, typically used for callbacks by Native Modules.
The bridge is tied to the RN lifecycle. It will be initialized or torn down when starting or stopping RN respectively.
While the bridge works asynchronously, there are use-cases where applications need to draw views on screen synchronously which the Bridge is unable to address.
The new Architecture Components: Fabric & TurboModules
Fabric
Its using Fabric Renderer in place of legacy Native Components to allow the reap of the New Architecture.
TurboModules
Reference: https://reactnative.dev/docs/next/the-new-architecture/pillars-turbomodules
An evolution of Native Modules can provide some additional benefits:
- Strongly typed interface that is consistent across the platforms
- The ability to write your code in C++, exclusively or integrated with another native platform language, reducing the need to duplicate implementations across platform.
- The use of JavaScript Interface for native code in place of the Bridge, this allows for more efficient communication between native & JavaScripte code.
Reconciliation VS Rendering
React on the web uses Virtual DOM, simulating the browsers’ HTML Dom rendering. But its not tied to HTML DOM (Docucment Object Model)
The Act of keeping a virtual representation of UI in memory, and have it synced with the external UI libraries is called reconciliation. However, there is a difference between reconciliation & Rendering in which we will explore further.
Reconciliaton identifies which part of the Virtual Dom tree has changed. Renderer uses that information to actually update the rendered app.
This separation implies that React DOM & React native can use their own renderers while sharing the same reconciliation provided by React Core.
React Native & React Navigation
RN provides its own UI abstraction layer over iOS & Andriod platforms. React Native Core and Native Components invoke the native views so you can write smartphone app UI with JavaScript instead of Kotlin/Java or Swift/ObjC.
Core Components.& Native Components
Native User experience such as tab navigation is covered by React Navigation.
React Navigation is a pure JavaScript library which does not include any native code. It is built on the other native libraries such as Reanimated, Gesture Handler, and Screens to implement the common app navigation patterns.
React Navigation provides the best practices on how to structure & navigate the app screens which is radically different from web development.
General advice regarding Navigation:
- Stick to basic navigation patterns & implement own custom navigators on React Navigation later.
- Place navigators & screens into dedicated directories to clearly separate them from other components.
Thinking in React
- Start With A Mock
- Break The UI Into A Component Hierarchy
- Build A Static Version in React
- Identify The Minimal (but complete) Representation Of UI State
- Identify Where Your State Should Live
- Add Inverse Data Flow
Reference: https://reactjs.org/docs/thinking-in-react.html
What are RN Hooks & When Should You Use Them?
The motivation behind Hooks explains the benefits:
Hooks let you split one component into smaller functions based on what pieces are related (such as setting up a subscription or fetching data), rather than forcing a split based on lifecycle methods. You may also opt into managing the component’s local state with a reducer to make it more predictable.
When getting started on React Native
When you set up your navigator stack, log only what you need
- Typically its based on auth status
https://reactnavigation.org/docs/nesting-navigators/
Login or public split will be essential
https://medium.com/@jacrplante/react-native-screens-multiple-stacks-da112a94ad24
https://betterprogramming.pub/react-navigation-with-typescript-fa7805f52ab0
- You want the logic to guard and abstract the concern
The best practice for setting up screens
https://reactnavigation.org/docs/nesting-navigators/
Have a set of screens that are only available as a logged in user
public
- sign in sign up
Under the logic setup, when you are conditionally setting your screens. when the authentication variable changes, RN will already automatically change to the default route of the logged in set of screens. Don’t call navigator.navigate(‘home’) for example
https://reactnavigation.org/docs/auth-flow
Then common screens that both logged in or public users may need
- help
- invite
- contact us
If you want to use drawer for your notifications, you can consider this setup
https://reactnavigation.org/docs/drawer-based-navigation
- Same initial idea, if its only available as an authenticated user, then set the drawer navigator under the logged in screens
The setup of Context
- Learning how to setup context is first thing’s first.
- Learning how to setup context alongside typescript is crucial as well. Put in time to learn and you will get the hang of things
https://blog.logrocket.com/how-to-use-react-context-typescript/
Interestingly at the app level, if you have a provider and wishes to use an updated context variable, you should be using context.consumer to consume the updates of the context, then passing it down to the children
Taking a Pitstop to Reflect
Going through the Process Thus Far
- There are a ton of setup issues
- During the process, take some time to understand the general steps to debug and get the project running
- Set up a UI library, in this case, using UI kitten
- The role of UI kitten is actually to replace some of the existing default native components
- Navigator setup
- You want your file setup appropriately for the right workflow
- Understand the use of context & usage of context
- definitely should consider a few options to understand their tradeoffs but for a start, this is sufficient
- Allowing the role of hierarchy to set into the thought process of the development
- definitely should consider a few options to understand their tradeoffs but for a start, this is sufficient
Pending learning topics ahead
- Setting up the HTTP setup to call an existing server
- Setting the login and auth context provider as well
- You need a space to put your auth tokens
- you need to manage auth state in the event of a logout or expiry
Setting up Auth
You need a storage that works the same as localStorage on your web application. In which, you can consider asyncStorage.
When you install this, you will need to pod install again, i encountered the same issue of no bundle URL present, metro is not able to start
Then you got to decide which screens are your public and which are your authenticated screens. General good practice: have 1 navigator stack and add in conditional screens instead of having multiple navigators. This way, you can animate between the login/logout as well. This best practice is indicated here.
Font setup
You want to know how to override default values, so you can put in your own branding. This general setup will be consistent across other projects as well. Take the time to understand this well, and understand how does the RN framework set this up will help you to setup configurabtions appropriately.s
Setting up the UI text fields component
To complete the authentication setup, you need to allow fields input for users to indicate their credentials.
From that perspective, you should consider to set up a common field component for password related
Learning how to setup your own common components from this video:
Component components needed
- Button
- with left icon, right icon
- loading
- Text
- Large
- Regular
- Small
- Input field
Generally, you will …props whatever that are default props of the native component
then you will use specific components to add in your styles & your additional components
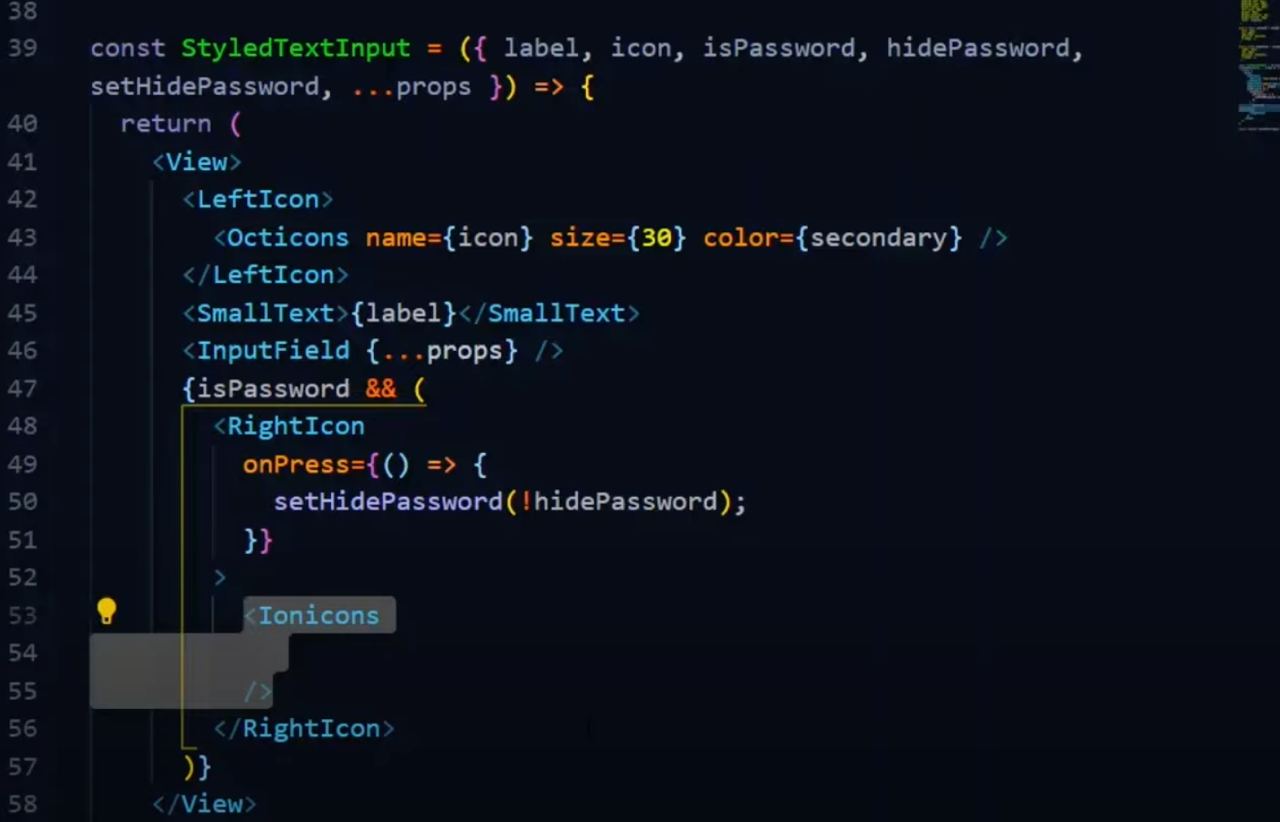 Code
Code

- for e.g. the text input field - the copywriting above the text is actually a smallText component
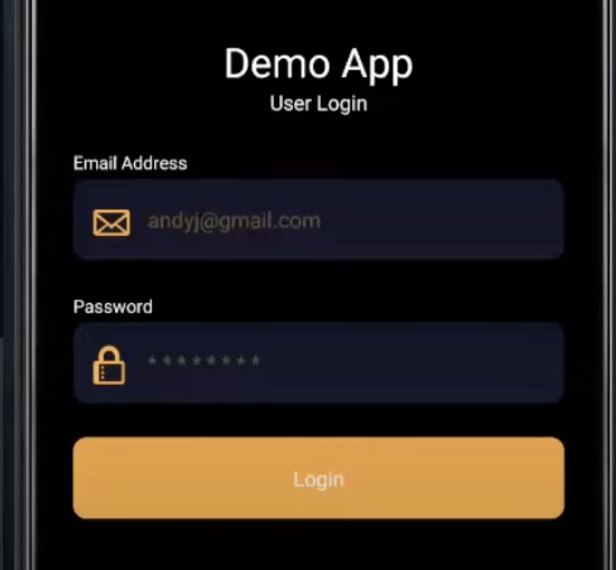 Sample UI

Styled common components are mainly for the styling
- its not for variable management. This is still done on the parent component.
- Parent: has value, has SetValue function. passing those into the component as props, and the props are just passed on
Learning from experience, you always want to provide a wrapper for the UI library’s components should 1. you can change the library away without hassle 2. you can universally make style changes to all the components across your application